
DISCLAIMER:
As previously stated, these are dev tutorials and blogs, created mainly for fun and research. Some of it you might find useful, and some of it might be terrible. I had to investigate and concoct some solutions without really knowing if there is a more efficient way, so if you know better, let me know. I hope someone finds this useful 😉
I said I’d be back! And although I tend to take longer than I expect, I’m on time!
KEEP IN MIND THIS IS A CONTINUED TUTORIAL so a lot of the naming of some functions and such were defined in the previous posts (vol1)
So we left off with out fancy colliding geometric disk, and that’s cool, but it´s also a bit too sharp and occasionally jaggy.
I personally wanted to explore rendering a scene with multiple cameras and composing it to generate a final image. So that is what we will do.
Depending on the length of this post, we might even delve into the obscure arts of using the camera depth map to sort the rendering of different objects with different effects within the same scene space. Fun!
-keep in mind, you need unity-pro to accomplish the techniques explained in this post-
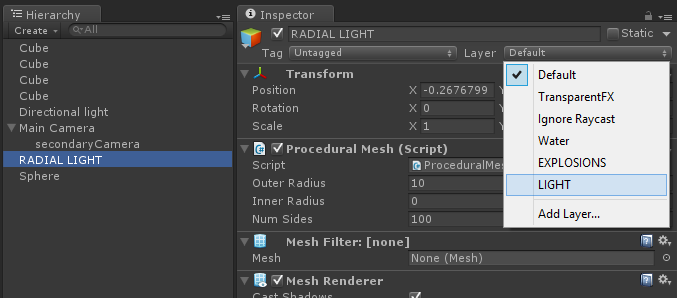
Well as I said, we have our disk (although this particular method can be used with any object), so the first thing we want to do is add it into another layer which will be ignored by our main camera, and rendered by our secondary camera.
It’s a very simple process. If you haven’t created a special layer for your secondary camera objects, you should do it now, assign it to all your affected objects:
Now you can do this by code or manually, for clarity, we will make it manually:
Create a second camera, and parent it to your main camera, with zeroed out transformations. Make sure all the camera properties such as field of view and clipping plane values are Identical. Now, on your main camera check the culling mask and disable the rendering, and on your child camera enable ONLY the layer you want rendered.
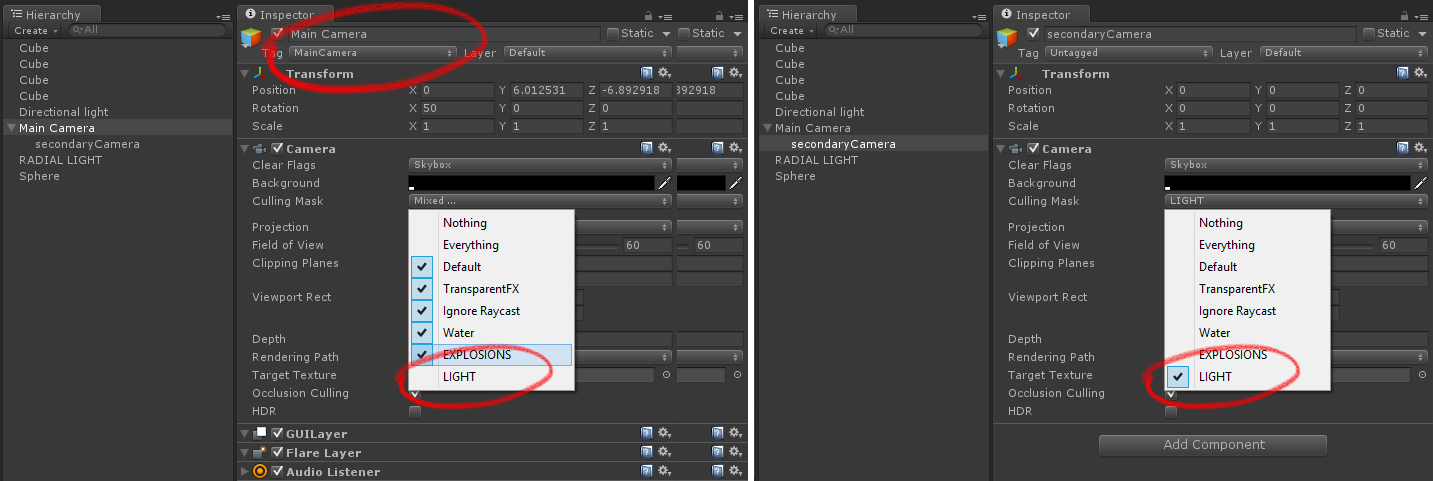
Now when you play the game the object in the secondary camera should not render at all in your main view.
Stupendous! Now we must create a new SHADER file and a new C# SCRIPT that will feed the scene info into the shader (and basically the GPU) For now, simply apply your new script to your main camera.
Once that’s set-up we must once again move to the marvelous world of code.
IN GENERAL, when working with image effects we need:
- The render texture of the Camera or Cameras we want to use.
- A shader or many shaders which define the image operation we want to apply.
- A material which uses the selected shader ( this is simply the way Unity passes information between GPU and CPU).
- The script to merge them together.
In this particular case, we obviously want to access both the main and the secondary camera’s target textures.
I’m also going to have 2 different shaders, one for blur, and one for composing the final image.
It’s important to mention that for security reasons you could want to refrain from exposing all the objects as public. In this particular example, I’m just opening it up, so that you can see the complete process, but for commercial plugins, and general usage (maybe this won’t be used by someone with any knowledge of the script and could inadvertently break it), you might want to keep them private and initialise them through code.
So! in our Main camera script (which I named ComposeLight) we define:
using UnityEngine;
using System.Collections;

public class ComposeLight : MonoBehaviour {
	public Camera lightCam; //THE SECOND CAMERA
	private RenderTexture LightRender , CompLight, BlurVert, BlurHoriz; //VARIOUS RENDER TEXTURES WE WILL NEED
	public Shader PostLight, GaussianBlur; //THE SHADERS WE WILL USE
	public Material LightComp, GenericBlur; //THE MATERIALS WE WILL ADD THE SHADERS TO
	private int ScreenX = 1280, ScreenY = 720; //A DEFAULT SIZE, WILL BE CHANGED
	public int blurIterations = 1; //BLUR PASSES
	public float blurIntensity;

	RenderTextureFormat RTT_Format; //JUST TO HAVE ALL RENDER TEXTURES UNIFORM

	public static ComposeLight _stImageComposer; //TO HAVE ACCESS INTO THIS SCRIPT FROM OTHERS
And On Start() or OnEnable() we set the various materials and shaders, as well as initialize.
[For this example I’m exposing the shaders, but you COULD dynamically load them with Shader.Find ].
void OnEnable()
	{
		_stImageComposer = this;
		LightComp = new Material(PostLight);
		GenericBlur = new Material (GaussianBlur);

		TextureFormat();
		camera.depthTextureMode = DepthTextureMode.Depth;
		lightCam.depthTextureMode = DepthTextureMode.Depth;

		CompLight = new RenderTexture (Screen.width, Screen.height, 16, RTT_Format);
		BlurVert = new RenderTexture (Screen.width, Screen.height, 16, RTT_Format);
		BlurHoriz = new RenderTexture (Screen.width, Screen.height, 16, RTT_Format);

		lightCam.targetTexture = new RenderTexture(Screen.width, Screen.height, 16, RTT_Format);
	}

//SELECT THE TEXTURE FORMAT FROM THE SCENE
	void TextureFormat()
	{
		//Default Unity formats

		if (Camera.main.hdr)
			RTT_Format = RenderTextureFormat.ARGBHalf;
		else
			RTT_Format = RenderTextureFormat.ARGB32;
	}
Once that is done we must “catch” the scene when it is going to render and apply all the effects pushing them into the final visible image:
void OnRenderImage (RenderTexture source, RenderTexture destination)
	{
		#if UNITY_EDITOR
		TextureFormat();
		#endif

		//WE SET THE ACTUAL CAMERA RENDER VALUES

		ScreenX = source.width;
		ScreenY = source.height;


		// SET LIGHT TEXTURE, WE MAKE SURE THE CAMERA HAS RENDERED
		lightCam.Render ();
		LightRender = lightCam.targetTexture;
		LightRender.name = "LightRender";
		CompLight.name = "GeomSampler";

		//APPLY RENDERED LIGHT MESH TO GAUSSIAN BLUR MATERIAL, AND SET THE REQUIRED VARIABLES

		GenericBlur.SetTexture ("_IMGtoBlur", LightRender);
		GenericBlur.SetFloat ("_Blur", blurIntensity);

		int iter = 0;

		//GAUSSIAN BLUR ITERATIONS

		while (iter < blurIterations) {
			//APPLY THE HORIZONTAL PASS
			GenericBlur.SetInt ("_Horiz", 1);
			Graphics.Blit ( CompLight, BlurHoriz, GenericBlur, 0);

			//SET THE HORIZONTAL BLURED IMAGE BACK AS THE SOURCE
			GenericBlur.SetTexture ("_IMGtoBlur", BlurHoriz);

			//MAKE A VERTICAL BLUR PASS
			GenericBlur.SetInt ("_Horiz", 0);
			Graphics.Blit ( CompLight, BlurVert, GenericBlur, 0);

			//SET THE COMPLETED BLUR BACK AS THE SOURCE
			GenericBlur.SetTexture ("_IMGtoBlur", BlurVert);

			iter ++;
		}

		//SET THE COMPLETED BLUR AS THE LIGHT TEXTURE TO COMPOSE

		LightComp.SetTexture ("_LightTex", BlurVert);

		Graphics.Blit (source, destination, LightComp, 0);

	}
This will make a lot more sense when we look into the Shader Files. But what this basically does is that it blurs the render of the second camera, and then composes it over the main camera.
The Blit function is particularly important. It Injects a SOURCE, into a DESTINATION using a MATERIAL, and applying a particular PASS on the shader.
Now let’s take a look at the shaders.
First the gaussian blur, In general a blur shader uses two passes, as explained here:
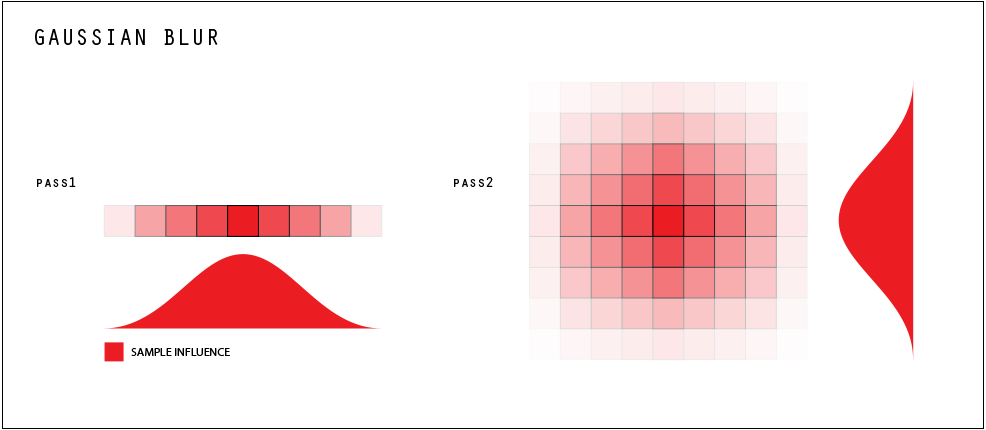
I Structured my shader so that you can select which direction to blur separately. I won’t go into too much detail about Shaders, but there’s plenty of sources to find that. You can also get the shaders at the bottom of the page to analyze fully.
Here is the starting structure of it:
Shader "Custom/BasicBlur" {
	Properties {
		//DONT REALLY NEED ANY EXTERNAL PROPERTIES
	}
	CGINCLUDE
	#include "UnityCG.cginc"
	sampler2D 				_IMGtoBlur;
	half					_Blur;
	half					_DistanceBlur;
	int 					_Horiz;
	half2 			v_blurTexCoords[14];

	struct v2f {
		half4 pos : POSITION;
		half2 uv : TEXCOORD0;
	};

	v2f vert( appdata_img v )
	{
		//VERY GENERIC VERTEX FUNCTION

		v2f o;
		o.pos = mul (UNITY_MATRIX_MVP, v.vertex);
		o.uv = v.texcoord;

		return o;
	}
Those are the basic values that you need.
_Horiz is simply a bool value to define which direction the pass will use.
v_blurTexCoords[14] is 14 simply because that gives a decent number of samples, you can try with more or less.
_DistanceBlur I’ll use for a little light scattering effect that we will add later.
The method GaussianBlur is our fragment shader, which in this case, iterates through each pixel on our screen.
As I mentioned before, I use the inverse of the alpha value as an additive to the blur intensity ( so that the more transparent the image, the more it is blurred ).
We then select which blur direction will be used, and populate the offset pixels, finally adding the samples with the gaussian distribution.
half4 GaussianBlur(v2f IN) : COLOR
	{

		half2 coords = IN.uv;
		 _DistanceBlur = 1 - tex2D(_IMGtoBlur, IN.uv).a;

		if (_Horiz == 1){
			composeHorizTexCoords(IN.uv);
		}
		else
		{
			composeVertTexCoords(IN.uv);
		}

		 half4 _FragColor = half4(0,0,0,0);

	    _FragColor += tex2D(_IMGtoBlur, v_blurTexCoords[ 0])*0.0044299121055113265;
	    _FragColor += tex2D(_IMGtoBlur, v_blurTexCoords[ 1])*0.00895781211794;
	    _FragColor += tex2D(_IMGtoBlur, v_blurTexCoords[ 2])*0.0215963866053;
	    _FragColor += tex2D(_IMGtoBlur, v_blurTexCoords[ 3])*0.0443683338718;
	    _FragColor += tex2D(_IMGtoBlur, v_blurTexCoords[ 4])*0.0776744219933;
	    _FragColor += tex2D(_IMGtoBlur, v_blurTexCoords[ 5])*0.115876621105;
	    _FragColor += tex2D(_IMGtoBlur, v_blurTexCoords[ 6])*0.147308056121;
	    _FragColor += tex2D(_IMGtoBlur, coords)*0.159576912161;
	    _FragColor += tex2D(_IMGtoBlur, v_blurTexCoords[ 7])*0.147308056121;
	    _FragColor += tex2D(_IMGtoBlur, v_blurTexCoords[ 8])*0.115876621105;
	    _FragColor += tex2D(_IMGtoBlur, v_blurTexCoords[ 9])*0.0776744219933;
	    _FragColor += tex2D(_IMGtoBlur, v_blurTexCoords[10])*0.0443683338718;
	    _FragColor += tex2D(_IMGtoBlur, v_blurTexCoords[11])*0.0215963866053;
	    _FragColor += tex2D(_IMGtoBlur, v_blurTexCoords[12])*0.00895781211794;
	    _FragColor += tex2D(_IMGtoBlur, v_blurTexCoords[13])*0.0044299121055113265;

		return _FragColor;

	}
The offset population methods are as follows:
This should save in the number of registries in the shader, as the same array is used for horizontal and vertical blurring.
void composeHorizTexCoords( half2 _texCoord )
	{
		half finalBlur = (_Blur * _DistanceBlur);

		v_blurTexCoords[ 0] = _texCoord + half2(-0.028, 0.0)* finalBlur;
	    v_blurTexCoords[ 1] = _texCoord + half2(-0.024, 0.0)* finalBlur;
	    v_blurTexCoords[ 2] = _texCoord + half2(-0.020, 0.0)* finalBlur;
	    v_blurTexCoords[ 3] = _texCoord + half2(-0.016, 0.0)* finalBlur;
	    v_blurTexCoords[ 4] = _texCoord + half2(-0.012, 0.0)* finalBlur;
	    v_blurTexCoords[ 5] = _texCoord + half2(-0.008, 0.0)* finalBlur;
	    v_blurTexCoords[ 6] = _texCoord + half2(-0.004, 0.0)* finalBlur;
	    v_blurTexCoords[ 7] = _texCoord + half2( 0.004, 0.0)* finalBlur;
	    v_blurTexCoords[ 8] = _texCoord + half2( 0.008, 0.0)* finalBlur;
	    v_blurTexCoords[ 9] = _texCoord + half2( 0.012, 0.0)* finalBlur;
	    v_blurTexCoords[10] = _texCoord + half2( 0.016, 0.0)* finalBlur;
	    v_blurTexCoords[11] = _texCoord + half2( 0.020, 0.0)* finalBlur;
	    v_blurTexCoords[12] = _texCoord + half2( 0.024, 0.0)* finalBlur;
	    v_blurTexCoords[13] = _texCoord + half2( 0.028, 0.0)* finalBlur;
	}

	void composeVertTexCoords( half2 _texCoord )
	{
		half finalBlur =  (_Blur * _DistanceBlur);

	    v_blurTexCoords[ 0] = _texCoord + half2(0.0, -0.028)* finalBlur;
	    v_blurTexCoords[ 1] = _texCoord + half2(0.0, -0.024)* finalBlur;
	    v_blurTexCoords[ 2] = _texCoord + half2(0.0, -0.020)* finalBlur;
	    v_blurTexCoords[ 3] = _texCoord + half2(0.0, -0.016)* finalBlur;
	    v_blurTexCoords[ 4] = _texCoord + half2(0.0, -0.012)* finalBlur;
	    v_blurTexCoords[ 5] = _texCoord + half2(0.0, -0.008)* finalBlur;
	    v_blurTexCoords[ 6] = _texCoord + half2(0.0, -0.004)* finalBlur;
	    v_blurTexCoords[ 7] = _texCoord + half2(0.0,  0.004)* finalBlur;
	    v_blurTexCoords[ 8] = _texCoord + half2(0.0,  0.008)* finalBlur;
	    v_blurTexCoords[ 9] = _texCoord + half2(0.0,  0.012)* finalBlur;
	    v_blurTexCoords[10] = _texCoord + half2(0.0,  0.016)* finalBlur;
	    v_blurTexCoords[11] = _texCoord + half2(0.0,  0.020)* finalBlur;
	    v_blurTexCoords[12] = _texCoord + half2(0.0,  0.024)* finalBlur;
	    v_blurTexCoords[13] = _texCoord + half2(0.0,  0.028)* finalBlur;
	}
of course this all is called by the Subshader defining a pass in this way:
Note that Ztest and Zwrite are all off since it is a image effect shader and there is no point in writing any of that.
Subshader {
		ZTest Off
		Cull Off
		ZWrite Off
		Fog { Mode off }

	//Pass 0 Blur
		 Pass
		 {
		 	Name "GaussianBlur"

		      CGPROGRAM
		      #pragma target 4.0
		      #pragma fragmentoption ARB_precision_hint_fastest
		      #pragma vertex vert
		      #pragma fragment GaussianBlur
		      ENDCG
	  	}
	}
/pre

SO! now our image is getting blurred, but that doesn't really do anything unless we compose it with our main camera output... with another COMPOSE shader.
The shader is set up pretty much in the exact same way (vertex shader doesn't really do anything), but the method we care about goes like this:
half4 Compose(v2f IN) : COLOR
	{


		half4 Final;

		half2 texcoords = IN.uv;

		//FIX WHEN UNITY DOES ANTIALIASING
		half2 Temptexcoords = texcoords;
		#if UNITY_UV_STARTS_AT_TOP
			if (_MainTex_TexelSize.y < 0)
		        Temptexcoords.y = 1-Temptexcoords.y;
		#endif

		half4 finalBlurSample = tex2D(_LightTex, Temptexcoords);
		half4 Scene = tex2D(_MainTex, texcoords);

		half ColCoef = length(finalBlurSample.a);
		Final = (Scene*(1-ColCoef) +  finalBlurSample);
		return Final;
	}
And finally, we set the scene up like this:

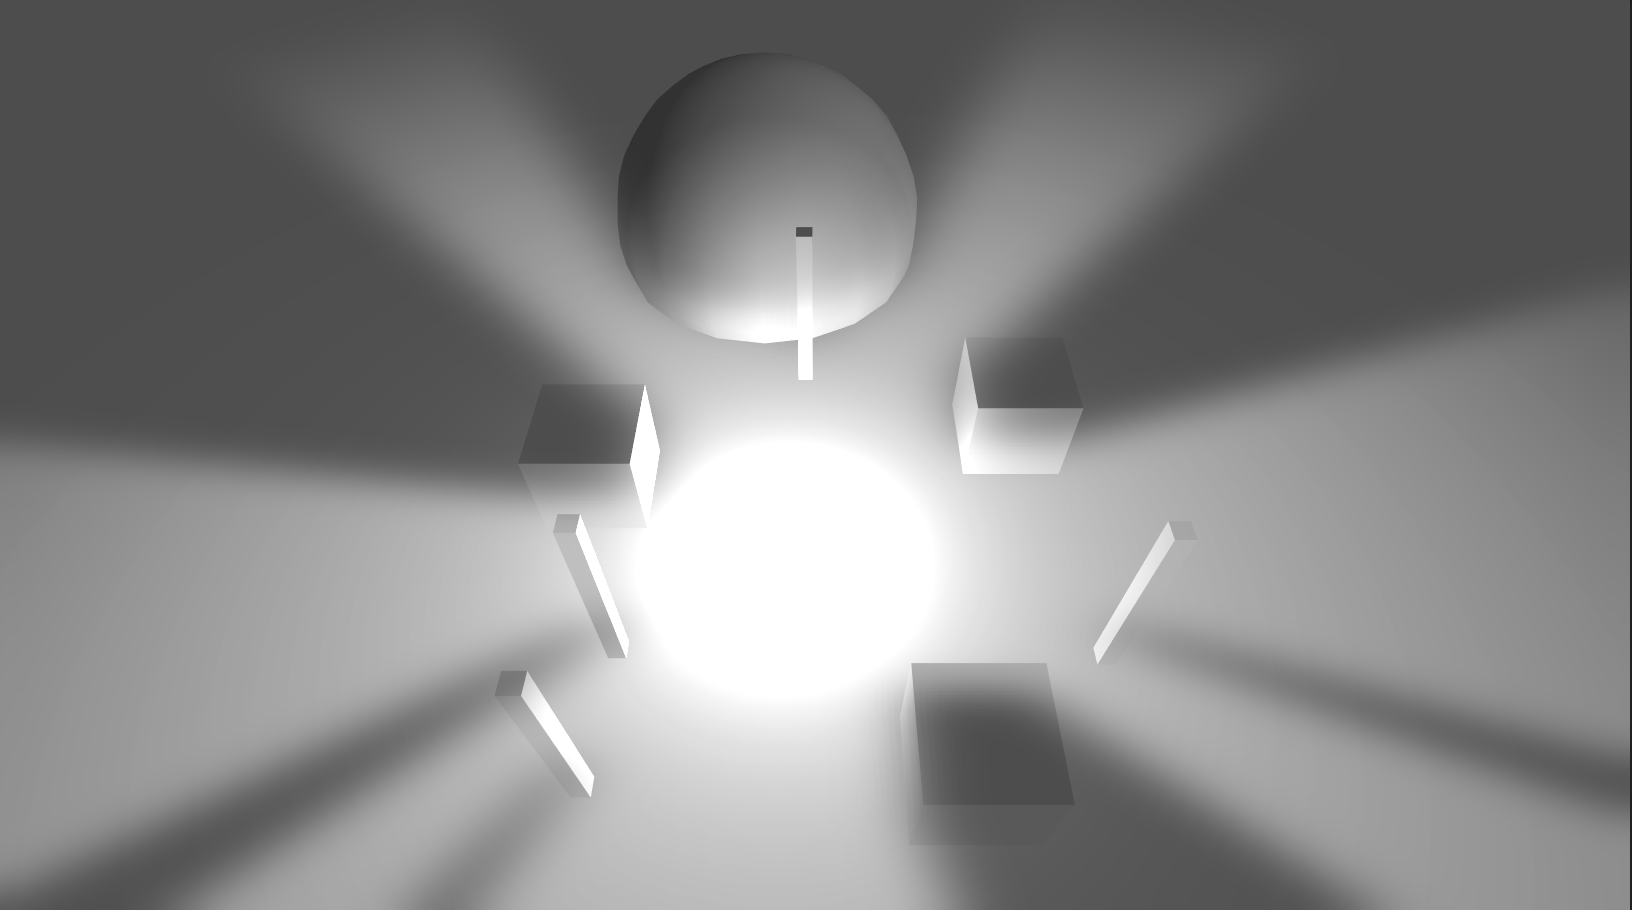
SO! Just push play and it should look a bit like this! (if you add some objects and stuffs)
There is one evident issue, the light is composed fully OVER the geometry, which works fine in a top down perspective, and with the gaussian blur turned up, but it can lead to weird behavior, as you can see here:

It would work better if we sampled the depth of the cameras…. But well that requires a fair bit more work, so we will see that next time ;P
ANYHOW! Here you can get the main scripts and shaders that I used for this, Note that I have updated the radial geometry generator script to follow the gameObject transformation. HERE!