DISCLAIMER:
This is a dev blog, which means the topics here could be a bit dry, I might ramble a wee bit, I’ll probably show some messy code that will definitely require improvement, and I will experiment with UTTERLY USELESS stuff. This is me playing around with things that I may not fully understand yet, and I’m definitely inviting anyone who knows better into the conversation. I also hope it can help out some people, since I had to investigate a lot to create some of the ideas I will show here .
So I decided to do this on the weekend, simply because I was playing around trying to recreate an old project of mine that I did in OpenGl with my own 2d engine on Unity3d. And I found out that a lot of the things that are simple when “closer to the metal” needed a bit more fumbling around in the now extremely popular engine.
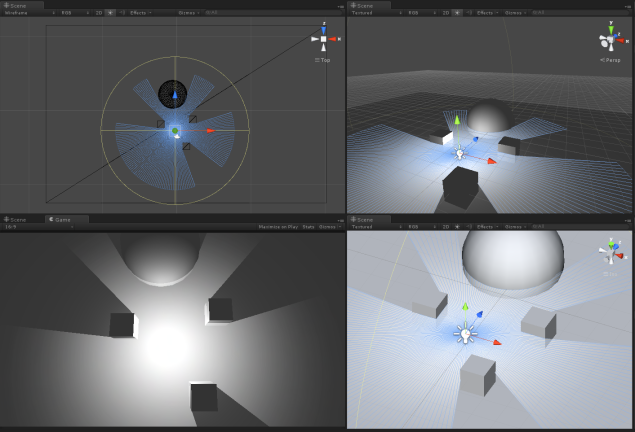
I wanted to create a 2d ” volume light Mesh” that interacted and collided with the level geometry, for a 2.5d top down game.

The first thing is to create a mesh in runtime in unity.
We need 5 basic Steps for that:
- Generate Points.
- Define Point Normals.
- Connect points to form triangles.
- Assign a UV space to each point.
- Connect the created mesh with a game object in the scene.
I started by the last one, since it is pretty simple. It can be all done by code but i find the more logical way to do it is to Create an empty object with a Mesh filter and leave the MESH box empty ( you can also add a mesh renderer with the material you want the object to render. You also want to create a script and assign it to this empty game object.
Like this:
Once that is done, we can go into the script.
We will need a few parameters, as a base, I’m defining the variables that will determine the building of the disk.
MeshFilter filter;

public float OuterRadius = 1.0f;
public float InnerRadius = 0.3f;
public int numSides = 50;
Do note that I am adding an inner radius, which is not necessary for the light example, ( but for -reasons- I want it ).
numSides is the number of sides we want the mesh to have. It is important since it will determine the fidelity of the light /shadows cast.
The first thing we want to do is get the Mesh filter so that we can access it easily later.
Clearing it just makes sure it is empty.
void Start () {

filter = gameObject.GetComponent();
Mesh mesh = filter.mesh;
mesh.Clear();

int numVerticesDisk = numSides+ numSides;

// ARRAY OF VERTICES

Vector3[] vertices = new Vector3[numVerticesDisk ];

...

}
We also define a few basic variables that we will use for the generation of the mesh.
Of course this is only in case you want to do a flat ring, If you were to make a disk without the inner radius (a disk instead of a ring) your number of vertices would instead be 1 + numSides;
You can find a bunch of different procedural shapes HERE.
Now we have created the Vertices but we must place them in the correct radial position.
//INITIAL VERTEX INDEX
int vert = 0;
float twopi = Mathf.PI * 2f;

//FOR THE OUTER CIRCLE OF THE RING
while( vert < numSides)
{
float rad = (float)vert / numSides* twopi;
RaycastHit hitinfo;

//WE CONSIDER THE TRANSFORM OF THE OBJECT, SO THAT IT CAN BE USABLE IN OTHER POSITIONS. ( TODO: ADD ROTATION AND SCALING SUPPORT)
Ray CurrentPt = new Ray(transform.position, new Vector3(Mathf.Cos(rad) * OuterRadius, 0f, Mathf.Sin(rad) * OuterRadius));
Physics.Raycast(CurrentPt,out hitinfo, OuterRadius);

if (hitinfo.collider != null)
{
vertices[vert] = hitinfo.point - transform.position;
}
else
{
vertices[vert] = CurrentPt.direction * OuterRadius;
}
vert++;
}
//FOR THE INNER CIRCLE OF THE RING
while (vert < numVerticesDisk )
{

//IF THERE IS AN OBSTACLE AND THE OUTER POINTS ARE CLOSER THAN THE INNER RADIUS, WE PLACE THE POINT IN THE EXACT SAME POINT

if ( vertices[vert-nbSides].sqrMagnitude < InnerRadius*InnerRadius)
{
vertices[vert] = vertices[vert-numSides];
}

else
{

//ELSE PUT THE POINT IN THE SAME DIRECTION AS THE CORRESPONDING OUTER POINT, BUT ON THE INNER RADIUS
vertices[vert] = vertices[vert-numSides].normalized * InnerRadius;
}

vert++;
}
Now we have the points placed , and we need to Set the normals, which in this case are very simple:
Vector3[] normals = new Vector3[vertices.Length];
vert = 0;

while( vert < vertices.Length )
{
normals[vert++] = Vector3.up;
}
They all look perfectly up as it is a flat mesh that we will use for a top down game, if you had a more nuanced shape you’d have to set the normals properly to instruct the engine how the light would react on the surface.
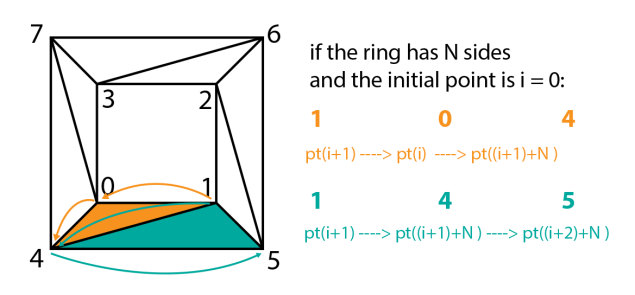
Next we have to place the triangles. This looks a bit more complex but it follows this logic:

You must link them in the same counter clockwise order to assure the mesh will display properly with all it’s faces looking UP. This is just a standard convention, if you mess up the order, a triangle could show upside down.
As you see in the figure, I came up with a sequence to loop through the vertices and compose the triangles.
For the last 2 triangles if ( tri == numTriangles -2) which are a special case since they wrap around, I simply wrote down the proper winding, since I couldn’t really find a good way to include them in the loop.
int numTriangles = numSides*2;
int[] trianglesVerts = new int[numTriangles * 3];

int tri = 0;

for ( int i = 0; tri < numTriangles ; i++)
{
int j = 3 * tri;
// SPECIAL CASE
if ( tri == numTriangles -2)
{
trianglesVerts [ j ] = 0;
trianglesVerts [ j+1 ] = numSides- 1;
trianglesVerts [ j+2 ] = numSides*2 - 1;
tri++;

trianglesVerts [ j+3 ] = 0;
trianglesVerts [ j+4 ] = numSides*2 - 1;
trianglesVerts [ j+5 ] = numSides% numTriangles ;

tri++;
}
else
{

// NORMAL CASE
trianglesVerts [ j ] = (i+1) % numTriangles ;
trianglesVerts [ j+1 ] = i % numTriangles ;
trianglesVerts [ j+2 ] = (numSides+ i) % numTriangles ;
tri++;

trianglesVerts [ j+3 ] = (i+1) % numTriangles ;
trianglesVerts [ j+4 ] = (numSides+ i) % numTriangles ;
trianglesVerts [ j+5 ] = (numSides+ i +1) % numTriangles ;

tri++;
}
And finally! we want to add UV values to each point, which is actually easier than it seems:
 Vector2[] uvs = new Vector2[vertices.Length];
int u = 0; while (u < nbSides*2)
{

//RADIAN ANGLE OF THE POINT
float rad = Mathf.Atan2(vertices[u].z, vertices[u].x);
float cosdist = (Mathf.Cos(rad)); float sindist = (Mathf.Sin(rad));

//PROJECTED TO ALL THE POINTS RELATIVE TO THE OUTER RADIUS AND OFFSET TO THE CENTRE OF THE MESH
uvs[ u ] = new Vector2( cosdist* 0.5f, sindist*0.5f) * vertices[u].magnitude/OuterRadius + Vector2.one*0.5f; u++;

}
Well, now Finally finally for real ( not really ) We apply all our computed data to the mesh and Optimize it, so that Unity will love it more.
mesh.vertices = vertices;
mesh.normals = normals;
mesh.uv = uvs;
mesh.triangles = triangles;

mesh.RecalculateBounds();
mesh.Optimize();
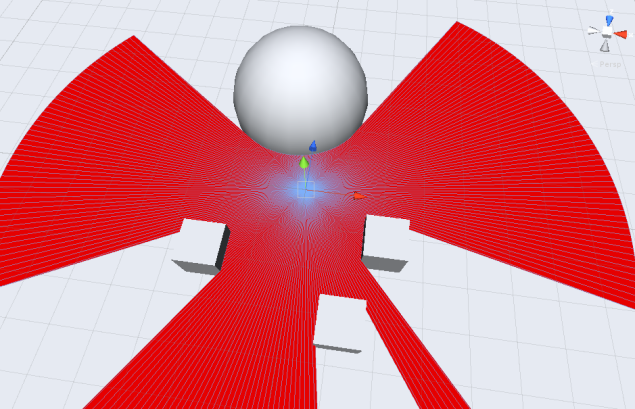
So, since all of that is done, you should be able to grab a few objects and colliders in scene and see something like this:
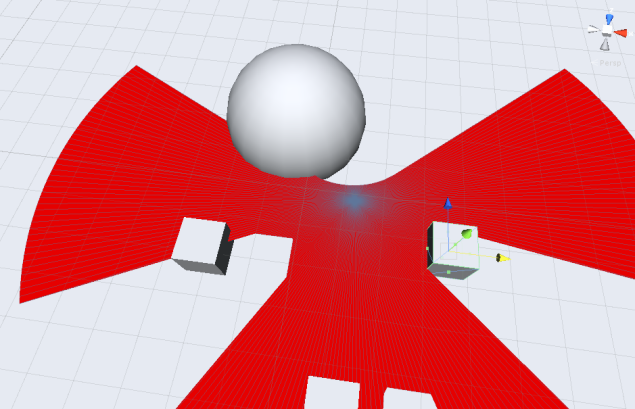
but there is one problem with this ( nothing major ), since it is set at the start, when you move the disk or the objects, the mesh does not update properly:
So what can we do about this? put it on the update() method instead!
You can try putting a texture on it to make sure the UV is properly mapped ( it should be )
Just so you know, I mentioned it before but I haven’t made it work with scale or rotation yet, as it is not required for my experimentation, but I might go back into it at a later state.
Also another goal of mine is to optimize the resulting mesh, as there is a lot of detail in the mesh that isn’t used and is required to get a nice looking result. I’m currently exploring alternatives to simplify the mesh procedurally on the building process.
This could also be done directly on Geometry shader, which is something that i’m playing around with now too.
If you want to test it for yourself, you can get the full script here. Do keep in mind that this is very beta code, so it is possibly not very well optimized and could have unexpected results.
Next week, I’ll show you how to feed this into a rendertexture and apply a blur effect to soften the light.
PS. You can modify the script to instruct it to draw the meshes in editor mode, by simply adding the [ExecuteInEditMode] command, and changing the script so it modifies the sharedmesh of the meshfilter. But this also causes a few problems with overwriting normals and UVs, so I recommend just viewing it in play mode.


