
DISCLAIMER:
As previously stated, these are dev tutorials and blogs, created mainly for fun and research. Some of it you might find useful, and some of it might be terrible. I had to investigate and concoct some solutions without really knowing if there is a more efficient way to solve the problems, so if you know better, let me know. In any case, I hope someone finds this useful 😉
Ok! I’m late! But I think that’s ok, I think last week was more than enough information. This should be faster though.
KEEP IN MIND THIS IS A CONTINUED TUTORIAL so a lot of the naming of shader methods and such were defined in the previous posts (vol1 , vol2)
Lets get down to it, as we noted last week, there is a problem with depth sorting when blending both cameras. But we can solve that with some depth Sorting!
In general, depth sorting is something that can be used in a variety of shader situations, and Unity’s documentation wasn’t terribly clear or unified about the smart usage of it. So Rejoice, I bring you the truth!
In Unity, Cameras can automagically render depth maps when they render their base image, if you tell them to.
As you may know, a depth texture is a grayscale texture where the lightness represents the depth of objects in the camera, but it must be interpreted from the native Unity render format for us to derive any meaning from it.
The first thing is to instruct the camera to render it with a specific format:
camera.depthTextureMode = DepthTextureMode.Depth;
lightCam.depthTextureMode = DepthTextureMode.Depth;
You can also set it to depth + normals, but we don’t really need that information for this situation. And if we use Normals, the precision of the map is lowered. The default depth texture format is ARGB32, but we are actually using full half4 color information so instead we use ARGBHalf which are a fair bit heavier, but depending on how much quality you are looking for, you should set the render texture that will store them to that format too.
Anyhow, if you recall, we have 2 cameras, rendering different objects in the same space, and we want the final render to sort considering the depth, so we need to:
- store both depth textures.
- compare each pixel depth in shader.
- compose and render the image considering which pixels should appear on top.
The first step here is creating a shader that will receive and simply convert our camera textures into a more usable form, but I’ll implement it as a new pass of our compose shader.
We will use this shader to BLIT our pre-rendered camera outputs, and convert them into grayscale depth textures.
The pixel function is pretty straight forward:
half4 GetDepth(v2f IN) : COLOR
	{
		// Linear01Depth returns a high precision float representing the depth.
		//_CameraDepthTexture stores the depth information in its .r component.
		// APARENTLY THERE ARE OTHER WAYS TO DECODE THE CAMERA DEPTH TEXTURE
		// BUT THIS WAS THE MOST FUNCTIONAL IN MY INVESTIGATIONS

		half depthValue = Linear01Depth (tex2Dproj(_CameraDepthTexture, UNITY_PROJ_COORD(IN.scrPos)).r);
		half4 depth;

		depth.r = depthValue;
		depth.g = depthValue;
		depth.b = depthValue;

		depth.a = 0;


		return depth;

	}
you could directly output one of these textures and get a result that should look a little like this:

There’s a catch though, you need to use “_CameraDepthTexture” on your shader, which is a Global variable automatically set by Unity when you render a camera which renders depth. This actually requires an ugly adjustment in your script, and it also needs to be declared in your shader as a 2dSampler.
IMPORTANT: As you can see, we are using a method that uses the depth buffer, which means that you need shader for your objects that writes z depth. This means that standard particle additive shaders will not work, causing the light camera render to come out completely white. Even a simple diffuse material will work, as long as it writes pixel depth. Self-ilum Vertex Lit works well for simulating Light.
Also remember to zero out the background of the secondary camera, so that it doesn’t interfere with the transference.
So now in the shader, we need:
uniform sampler2D		_MainTex,
				_LightTex,
				_BaseDepth, //will store the depth map of the main camera.
				_LightDepth, //will store the depth map of the secondary camera render.
				_CameraDepthTexture; //The temporary depth rendered by the camera
In your script, you need to call Render() on the camera you wish to sample before you can actually sample the depth map. For the main camera, that’s not a problem since you are in the “OnRenderImage” method. ‘
In particular you need to follow this process:
		//ONRENDERIMAGE MAIN CAMERA HAS JUST RENDERED.
		//PRINT FIRST DEPTH TEXTURE
		Graphics.Blit (source, depthBase, LightComp, 1);

		// SET LIGHT TEXTURE
		//CALL THE SECOND CAMERA RENDER
		lightCam.Render ();
		LightRender = lightCam.targetTexture;
		LightRender.name = "LightRender";
		CompLight.name = "GeomSampler";

		//PRINT SECOND DEPTH TEXTURE
		Graphics.Blit (source, depthEffect, LightComp, 1);

		//ADD THE TEXTURES TO THE MATERIAL
 		LightComp.SetTexture ("_BaseDepth", depthBase);
		LightComp.SetTexture ("_LightDepth", depthEffect);
So now, we have to actually compare the depths, adding yet another pass to your shader. Which writes into a texture the resulting non obstructed light:
//In the actual sorting method ( which we call from the pixel shader).
//We make sure that if there base depth  is higher than the light depth, we clear the map if that is the case.

	half4 BlurDepth(half4 depthBase, half4 depthLight, half4 lightSample, half4 baseSample)
	{
		if(depthBase.r < depthLight.r ||  depthLight.r >= 0.95)
		{
			// we sample the base render outside the lit area
			return  half4(baseSample.r,baseSample.g,baseSample.b,0);
		}
		else
		{
			//if the light depth is over everything else, we simply return the light sample.
			return lightSample;
		}
	}

//This is the actual pixel function.

	half4 CorrectWithDepth(v2f IN) : COLOR
	{

		half2 texcoords = IN.uv;

		half2 Temptexcoords = texcoords;
		#if UNITY_UV_STARTS_AT_TOP
			if (_MainTex_TexelSize.y < 0)
		        Temptexcoords.y = 1-Temptexcoords.y;
		#endif


		half4 LightSample = tex2D(_LightTex, Temptexcoords);
		half4 LightDepth = tex2D(_LightDepth, Temptexcoords);

		half4 BaseDepth = tex2D(_BaseDepth, Temptexcoords);
		half4 BaseSample = tex2D(_MainTex, Temptexcoords);

		half4 finalBlurSample = half4(0,0,0,0);

		 finalBlurSample += BlurDepth(BaseDepth, LightDepth, LightSample, BaseSample);

		return finalBlurSample;
	}
With this you can configure it to first correct the depth, and blur or the other way around. You can mix the process as you wish.
My basic configuration goes like this:
 void OnRenderImage (RenderTexture source, RenderTexture destination)
 {

 //INTERPRET BASE DEPTH TEXTURE
 Graphics.Blit (source, depthBase, LightComp, passes.interpretDepth);

 // SET LIGHT TEXTURE
 lightCam.Render ();
 LightRender = lightCam.targetTexture;
 LightRender.name = "LightRender";
 CompLight.name = "GeomSampler";

 //GENERATE SECOND DEPTH TEXTURE
 Graphics.Blit (source, depthEffect, LightComp, passes.interpretDepth);

 //ADD THE GENERATED TEXTURES TO THE MAIN COMPOSER MATERIAL
 LightComp.SetTexture ("_BaseDepth", depthBase);
 LightComp.SetTexture ("_LightDepth", depthEffect);
 LightComp.SetTexture ("_LightTex", LightRender);

 //CALCULATE THE SORTED DEPTHS
 Graphics.Blit (source, CompLight, LightComp, passes.correctCulling);

 //APPLY RENDERED LIGHT MESH TO GAUSSIAN BLUR MATERIAL

  blurFunction ();

 //SET THE COMPLETED BLUR AS THE LIGHT TEXTURE TO COMPOSE

 LightComp.SetTexture ("_LightTex", BlurVert);

 Graphics.Blit (source, destination, LightComp, passes.compose);

 }
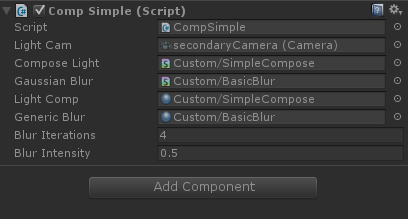
And now you connect all components ( which we have done before in this series),
So now that we have set everything up like that, when you press play you should see something like this:
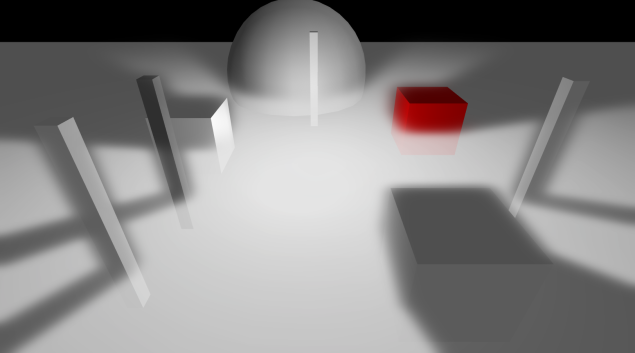
Hmmm.. well I don’t know if you’d use it like this… but it doesn’t look too bad!
As usual, I’ve revised the previous scripts and updated them (found some really dumb errors and performance hazards) and you can get ALL of the used scripts HERE.
The idea is that you can do a few creative things with this, such as selective blur/glow of objects in your scene too. You can even modify the blur lengths to create some fancy vertical or horizontal light banding.
most of them are commented, so you can play around and see if it tickles your fancy.
I think this finishes our first series of Tutorials / Dev Blogs.
I might look into how to sample a gpu rendertexture from your code next week though, for example, to find out if an object is in the light or out of it.
Cyaz!